Master the art of stable diffusion mask blur with our helpful tips and tricks. Level up your editing skills on our blog.
Are you tired of struggling with image inpainting and mask blur? Stable Diffusion Mask Blur is here to simplify the process for you. In this blog, we will take a deep dive into understanding Stable Diffusion Web UI and its features. We will also explore the image input for inpainting and how to optimize images for the best results. Furthermore, we will look into different diffusion models and how to choose the right one for your project. In addition, we will discuss in-depth about inpainting settings, including key parameters for stable diffusion and customizing settings for optimal results. Moreover, we will cover mask blur in inpainting, including its impact and techniques to achieve stable mask blur. We have also included practice exercises on inpainting, along with tips and tricks to enhance your results. Lastly, we will highlight some limitations that you should consider when using Stable Diffusion Mask Blur. Join us as we make image editing a breeze!
Understanding Stable Diffusion Web UI
The user-friendly sd webui simplifies image inpainting, offering intuitive controls for easy navigation. It features stable diffusion with denoising strength control and allows users to adjust mask blur and inpaint area effortlessly. The generated image can be fine-tuned using the slider feature and text prompt, making AI-powered stablediffusion accessible to all.
Features of the Web UI
The web UI conveniently enables inpainting of masked content, supporting a batch count parameter for multiple images. Users have control over diffusion model and masking, ensuring stable diffusion for image quality enhancement. Entire images or specified masked areas can be effortlessly inpainted using the web UI.
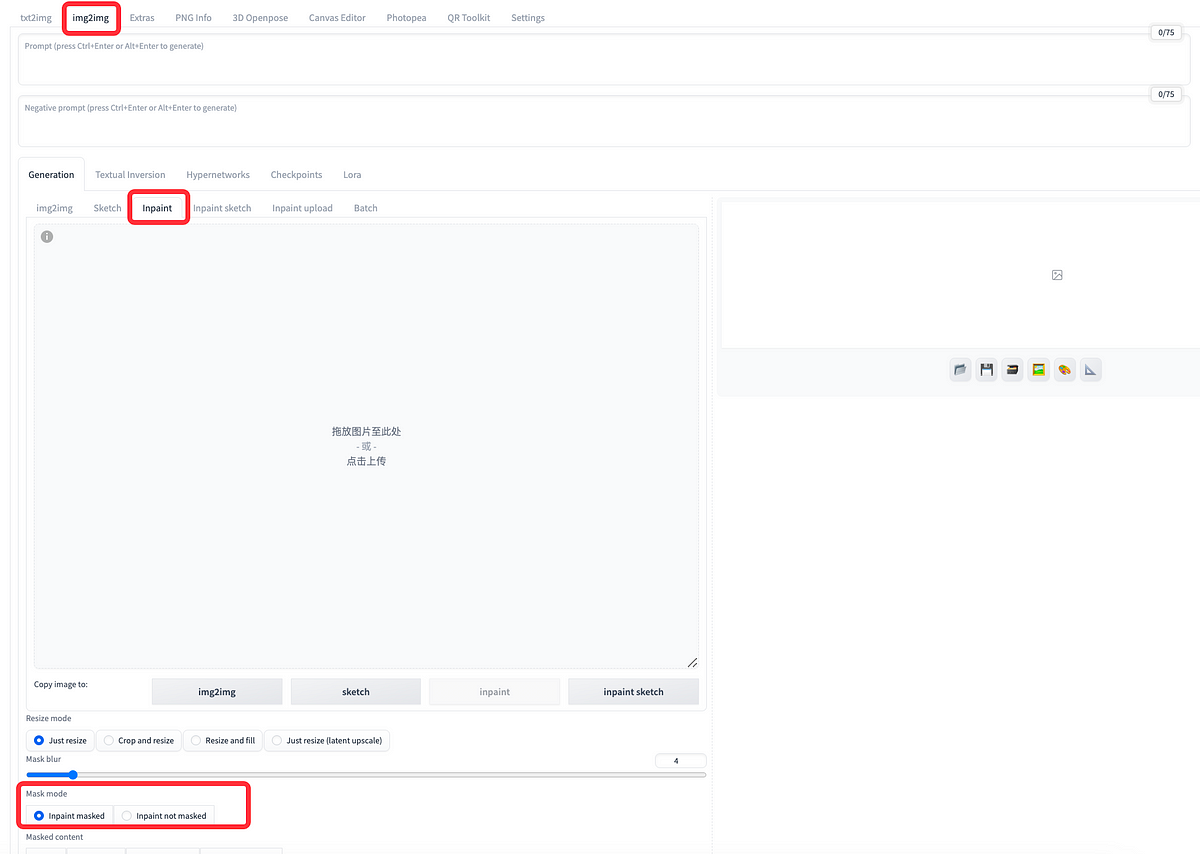
How to navigate the Web UI
Navigating the sd webui is beginner-friendly, offering a seamless tutorial for users. With simple text prompt controls, adjusting padding and batch size becomes effortless. It also provides a batch size parameter for generated image inpainting, enhancing the AI-powered features.
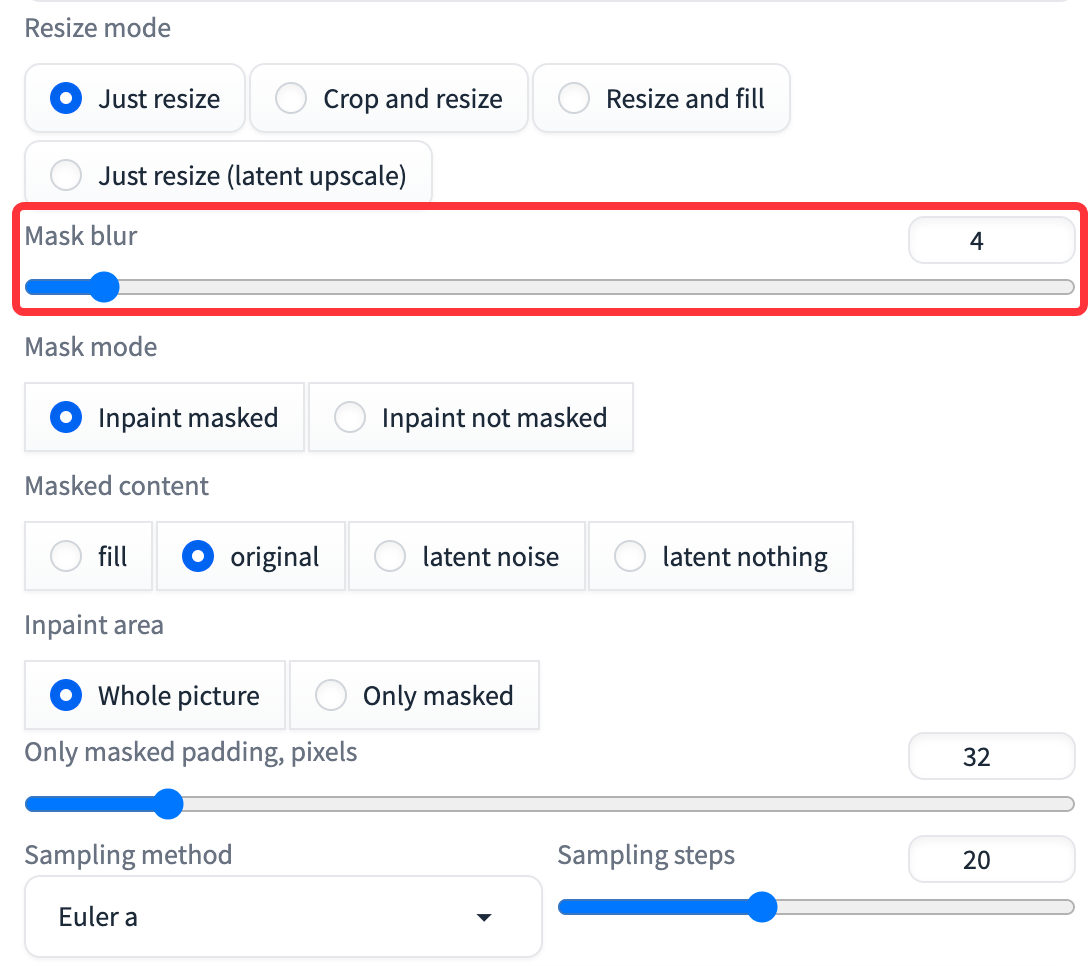
Image Input for Inpainting
Inpainting success hinges on choosing the right image and optimizing it for stable diffusion. The web UI facilitates image optimization by selecting the appropriate model. Inpainting requires a stable diffusion model for precise control over image size, empowering users to inpaint original prompt images effectively with positive prompts.
Choosing the right image
Selecting the appropriate image significantly influences the success of inpainting. The SD WebUI facilitates inpainting with the best diffusion model, allowing users to inpaint original images with negative prompts for better results. Ensuring a stable diffusion model choice is crucial for achieving the right image inpainting quality.
Optimizing Image for Inpainting
Inpainting success depends on stable diffusion to inpaint masked areas of images. This process involves iterative optimization of mask content within the images. Choosing the right stable diffusion model is crucial for successful inpainting, requiring appropriate masking of original images.
Exploring Diffusion Models
Understanding diffusion models is crucial for inpainting quality, ensuring successful results and control. Users must adapt diffusion models for stable and quality inpainting, provided by the web UI’s sd webui. Choosing a stable diffusion model is essential for inpainting success, influencing the generated image’s quality and integrity.
Understanding Diffusion Models
Understanding the selection of diffusion models is crucial for successful inpainting. Adaptation of the right model guarantees quality results, and users can control their inpainting needs through model customization. The web UI provides a stable diffusion model for precise inpainting control, ensuring generated images meet the desired criteria.
Choosing the best model for your project
The optimal model choice ensures a stable inpainting process. Users must select a model that suits their specific inpainting requirements. The web UI enables users to control the diffusion model for successful inpainting outcomes. Choosing a stable diffusion model is crucial for achieving the best results.
In-depth into Inpainting Settings
Inpainting settings involve correct control of latent noise and cfg scale to achieve the best results. Understanding and controlling these settings via the web UI are essential for successful inpainting, which requires a stable diffusion model and latent noise control for optimal outcomes. Users can manipulate the diffusion model and latent noise to ensure successful inpainting.
Key parameters for stable diffusion
Understanding the influence of diffusion strength on image quality is crucial. Customizing batch size can enhance stability. Setting denoising strength and optimizing cfg scale are vital for a stable diffusion model. The iterative process ensures smooth stable diffusion.
Customizing settings for optimal results
When customizing settings for optimal results, it’s essential to adjust masking for inpaint area, control padding for inpainting, and customize batch count for the inpainting process. Utilizing the controlnet tab for inpainting and stable diffusion for inpaint content can greatly enhance the generated image.
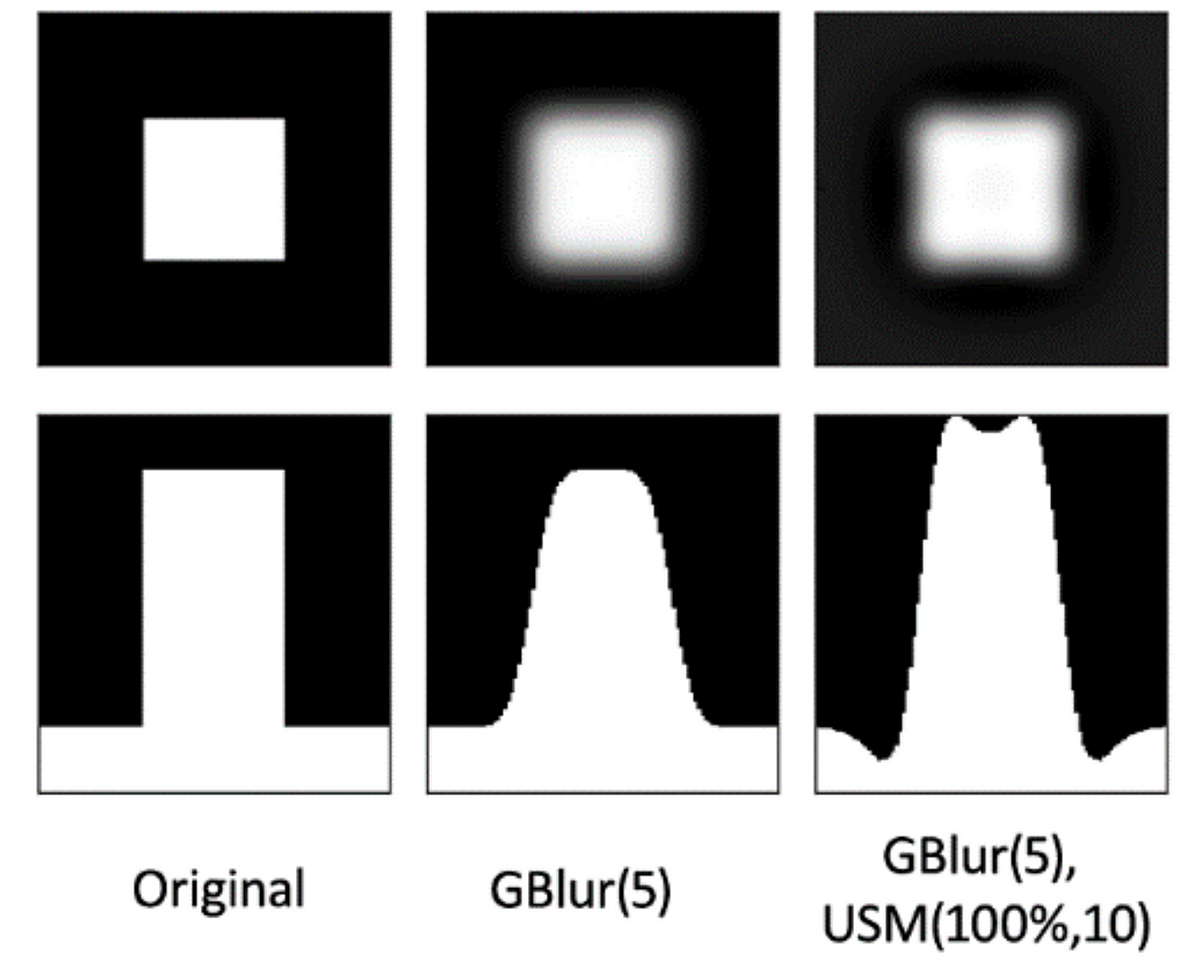
A white square undergoes one iteration of blur and sharpen Figure 4A white square undergoes
Mask Blur in Inpainting
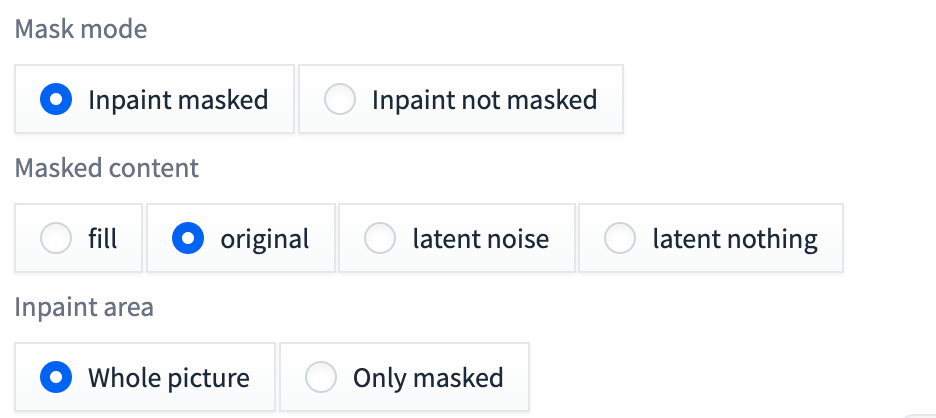
Setting the content of a mask for blur inpainting involves utilizing stable diffusion for mask mode inpainting. Increasing mask blur and adjusting the mask area are crucial for achieving the best results in masked area inpainting.
Understanding Mask Blur Impact
Analyzing the impact of mask blur on inpaint area, considering the pixels affected by blur for right image inpainting, and understanding the overall impact on the original image.
Techniques to achieve stable Mask Blur
Using Euler a yields stable mask blur. Mask blur is vital for inpainting. Achieve stability in photoshop. Leverage GPU for stable mask blur. Implement in GIMP.
Practice exercises on Inpainting
Applying best practices for integrating new objects through inpainting, utilizing latent noise to enhance object addition, and inpainting the entire image for optimal results can significantly improve generated image quality. Incorporating positive text prompt examples while applying stable diffusion models are crucial for achieving AI-driven sd webui inpainting success.
Example 1: Adding new objects through inpainting
Utilizing the masked area is crucial for seamlessly adding new objects. Inpaint content application allows for this process, enabling stable diffusion for a natural integration. The inpainting process involves utilizing both original and negative prompts to achieve realistic outcomes.
Example 2: Optimizing mask blur
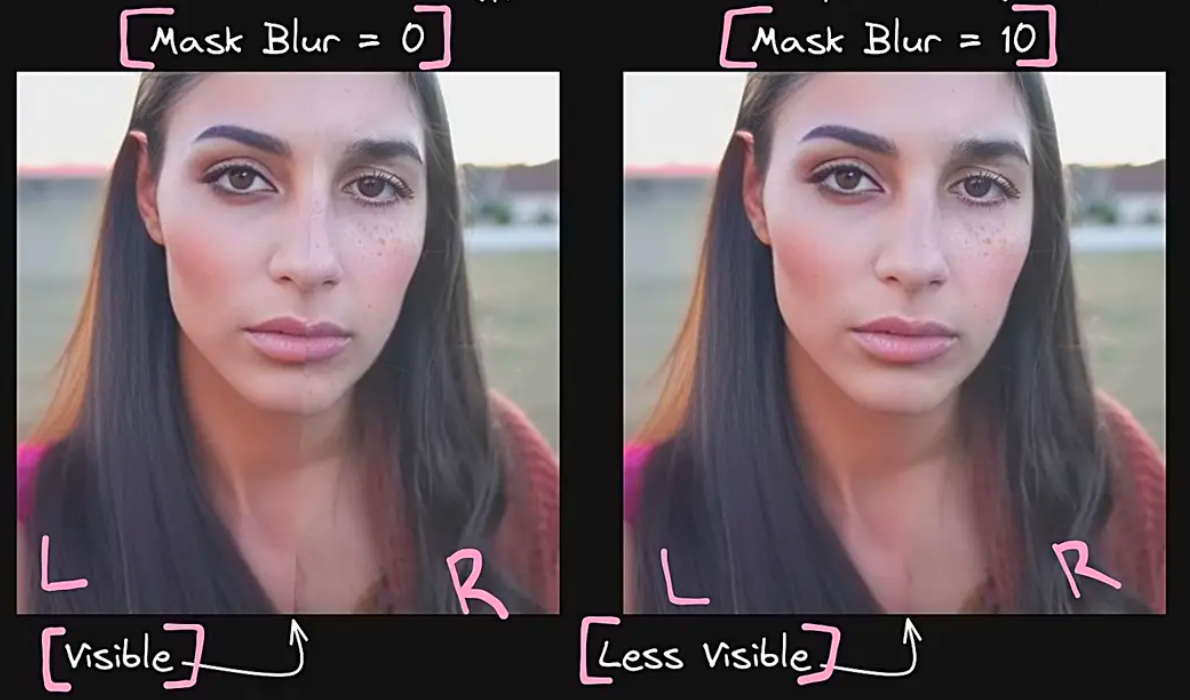
The process of optimizing mask blur involves utilizing it for inpainting and stabilizing the masking process. In this tutorial, we’ll delve into the inpainting process for stable mask blur, along with a tutorial on optimizing mask blur using comfyui.
Tips and Tricks for Inpainting
Utilizing slider control for addressing common inpainting challenges can significantly enhance the generated image. Applying masking techniques and leveraging the inpaint area are crucial for achieving optimal results. Additionally, AI-driven text prompts can aid beginners in understanding stablediffusion methods.
Quick fixes for common challenges
Applying padding resolves inpainting challenges. Adjust the width for common challenges. Utilize checkpoint tab or UI control for quick fixes. Seek Reddit info for better understanding. Enhance results with generated image and sd webui.
Enhancing inpainting results
Inpainting results can be improved using diffusion masks. Stable diffusion masks effectively remove noise and preserve edges. The choice of blur parameter is crucial for balancing texture preservation and smoothing. A multi-scale approach is recommended for better results on larger images. Experimenting with different mask shapes is vital for various inpainting scenarios.
What are some limitations to consider when using Stable Diffusion Mask Blur?
Limitations to consider when using Stable Diffusion Mask Blur include potential slowdown in rendering times due to its computational intensity. Highly detailed or complex images may not yield optimal results. Proper placement and sizing of the mask are crucial for desired outcomes. Adjusting settings for the desired blur level can be challenging for some users.
Conclusion
To achieve stable diffusion mask blur, it is crucial to understand the features and navigation of the Stable Diffusion Web UI. Additionally, choosing the right image and optimizing it for inpainting plays a significant role in obtaining optimal results. Exploring different diffusion models and selecting the most suitable one for your project is also essential. In-depth knowledge of inpainting settings, including key parameters and customization options, will further enhance your results. Understanding the impact of mask blur and employing techniques to achieve stability is crucial in the inpainting process. To practice and improve your skills, engaging in exercises such as adding new objects through inpainting or optimizing mask blur can be beneficial. Furthermore, learning tips and tricks for inpainting, including quick fixes for common challenges and techniques to enhance results, will elevate your abilities. While Stable Diffusion Mask Blur is a powerful tool, it is vital to consider its limitations and adapt accordingly. By mastering these techniques and continuously honing your skills, you can effortlessly create stunning and stable mask blur effects for your projects.
Originally published at novita.ai
novita.ai provides Stable Diffusion API and hundreds of fast and cheapest AI image generation APIs for 10,000 models.🎯 Fastest generation in just 2s, Pay-As-You-Go, a minimum of $0.0015 for each standard image, you can add your own models and avoid GPU maintenance. Free to share open-source extensions.

